Wednesday, December 28, 2011

Best of 2011- Your Favorites and Mine

It's time for the annual recipe round up! Where I list what posts were the most popular from this year, and pick a few of my own that may have fallen by the wayside.

First up, the top five most popular posts of this year. And let me just say, you guys have good taste, like I would expect anything less from you! By the way, have you been working out? You look great. And that outfit, you're totally working it.

The top five most popular posts from 2011!


Five of my favorite posts from this year!

 No bake, completely addicting, and the perfect combo- chocolate and peanut butter!

 My (hopefully simple) step by step guide to make pate-a-choux. Use it for cream puffs, eclairs, or these savory cheese puffs!

 Probably my all time favorite dinner. My mouth is watering just thinking about it

 A new (to me) recipe, but my current go-to when it comes to the perfect chocolate chip cookie!

Simply the best. Make sure you have someone to share this with or you'll find yourself eating the leftovers cold from the fridge. On second thought....

Saturday, December 24, 2011

Buche de Noel


Before we get to the yule log, I have to wish my sister a happy birthday! She's actually in town visiting so we're going out to celebrate later! Happy birthday Alex!


Now, I love, love, love a good yule log. They're so fun and festive, and (sadly) you can only make them once a year! Actually, since we're not a Christmas family, I've never gotten to make one.

Until this year, thanks to our neighbor's holiday party.


I've bribed them for months with sweets like brownies and bars so when they're annual holiday party rolled around I'd be a shoe-in for dessert.

This cake is so fun, and I know it looks really involved, but I promise, it's not. Remember the pumpkin roll cake? Same idea but with a few snazzy embellishments. It is the holidays after all. And you can make it as crazy or as simple as you want. Go all out with fondant and meringue decorations, or simply cover the whole thing in ganache and call it a day. Drench anything in melted chocolate and people will go crazy for it. You can quote me on that.


 Buche de Noel (Yule Log)

Ingredients:
For the cake
1/4 cup powdered sugar
4 egg whites
3/4 cup granulated sugar
4 egg yolks, lightly beaten
1/4 cup plus 1 Tbsp cake flour, sifted
4 Tbsp unsalted butter, melted

1. Preheat oven to 350 degrees and line a jelly roll pan with parchment or a silicone baking mat. Grease well with butter and flour or non-stick spray. Set aside. Lay out a clean dish towel and sift the powdered sugar evenly over it. Set this aside as well.
2. With an electric mixer, whisk the egg whites on medium speed until foamy. Add the sugar very slowly. Turn the mixer to medium-high and whisk for 4-5 minutes, or until stiff peaks form.
3. Sacrifice about 1/4 cup of the egg white mixture to the egg yolks, stirring well to combine. Add this mixture back to the rest of the meringue and begin to incorporate using a rubber spatula and folding gently.
4. Add the cake flour in 2-3 batches, folding just a few times in between each addition.
5. Before the batter is completely incorporated, sacrifice some of it to the melted butter, stirring well to incorporate. Add this mixture back to the rest of the cake batter and fold until the batter is completely incorporated. Don't overfold or you'll deflate the batter.
6. Pour the batter onto the prepared sheet pan and spread evenly with an offset spatula. Don't work the batter too much but try your best to get the batter even.
7. Bake 7-9 minutes, or until the edges are a light golden brown and the cake springs back to the touch. Immediately unmold the cake onto the sugared dish towel. Peel back the parchment very, very carefully, trying not to tear the cake. Starting with one of the long edges, use the dish towel to roll the cake up. You'll be rolling the dish towel along with the cake so it will end up rolled inside and around the cake. Set aside to cool completely.

For the icing:
1 lb unsalted butter at room temperature
6 oz shortening
1 lb powdered sugar
4 oz melted chocolate, or more to taste
4 oz fresh raspberries, crushed, or any other desired flavoring

1. In the bowl of an electric mixer with the paddle attachment, cream the butter until soft.
2. Add the shortening and beat on medium speed until light and fluffy.
3. Add the sugar gradually and beat until smooth.
4. Remove about 1 1/2 cups of the icing to another small bowl. Stir in the raspberries or your desired flavorings.
5. Add the melted chocolate to the remaining icing, beating on low just to combine.


For the meringue mushrooms, trees, etc:
2 egg whites
1/4 tsp acid (vinegar, cream of tartar, lemon juice, etc.)
1/2 cup granulated sugar

1. Preheat oven to 200 degrees F. Line a baking sheet with parchment paper or a silicone baking mat.
2. With an electric mixer, whisk the egg whites on medium speed until foamy. Add the acid.
3. Very gradually add the sugar. Turn the mixer to high and whisk until very stiff peaks form.
4. Fit a pastry bag with a medium sized plain round tip. Fill with the meringue and pipe desired shapes onto the prepared sheet pan. Traditional ones include mushrooms, trees, and snowmen.
5. Bake the meringues for at least an hour, or as long as it takes for the shapes to dry out and harden.

To assemble the cake:
1. Unroll the cooled cake carefully and completely. Top the cake with the raspberry icing and spread evenly, all the way to the edges.
2. Re-roll the cake in the same way you did with the dish towel. End with the seam on the bottom.
3. Use a serrated knife and trim the edges of the cake on an angle. Cut off one or two small pieces, a few inches long.
4. Transfer the main cake roll to the serving platter you plan to use. Attach the "branches" either next to or on top of the log. Simply press them on gently until they stick.


5. Use a medium star tip and pipe the chocolate icing onto the log, covering the sides completely. You can leave it like this, or use an offset spatula to add more texture to the log. Pipe a swirl onto the exposed edges or leave them plain.


6. Dust with powdered sugar and garnish with meringue decorations.

Friday, December 23, 2011

Christmas Tree Cookies


Two days before Christmas! Who has all their shopping done? Who's still running around like a crazy person?

Don't stress. Here- have a cookie. It's pointy and festive.


And the only kind of Christmas tree you'll find in my house.

Where are the menorah cookies, you're wondering? Sorry, that's not one of the options Williams-Sonoma sells. I don't actually have a real menorah either (sorry Mom).


Plus, Christmas tree cookies are just so much more versatile. I chose to go with a paler color scheme, for example. Just something a little different. And I think they go pretty well with my reindeer.


Thursday, December 22, 2011

Reindeer Cookies


If only Santa came to my house. He'd be getting some seriously cute cookies.

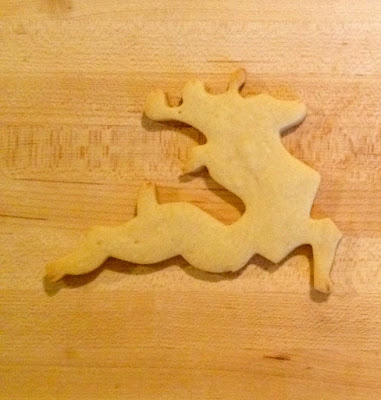
Although, they weren't so cute to begin with...

I kept looking at my cookie cutter, trying to envision how to decorate these skinny little reindeer with their big fat necks, and I just couldn't.


Seriously, what kind of radioactive animal is this? It looks like a cross between an emaciated deer and a lion. 

So I started doing a little fiddling and re-shaping and bending and figured out how to make it work.


Much better.

Fancied up with some royal icing, they look even cuter.


Love the little dots on their rumps!


And of course, what's a group of reindeer without Rudolph?


Santa's missing out. Oh well, his loss is our gain.

Wednesday, December 21, 2011

Buttermilk Sandwich Bread


Tonight's the second night of Hanukkah, and while I may not be having my mom's crispy potato latkes, or sweet noodle kugel, there IS a brisket in the oven that's making the whole house smell like the holidays.

And no, I'm not making brisket sandwiches (not tonight anyway), so why I am going on and on about it in a post about bread? Because one of these fluffy loaves got packaged up and sent to my dad as his Hanukkah gift this year.

Now, both my parents love sweets, but I think I get my addiction to bread from my dad (don't worry Dad, I've totally forgiven you for the Atkins phase).

When I was in school in New York, I would try to send as many goodies back to my family as I could, although walking into FedEx with a lemon meringue pie wasn't exactly do-able. But probably the unit that bankrupted me in mailing fees the most was our bread unit.


I know my dad loves chocolate, and ice cream probably more than anything, but whenever I offer to bake and mail him something, he usually goes for something yeasty and carbo-loaded, preferably chocked full of whole grains, seeds, or sourdough. I looked through a lot of recipes before settling on this one, and I am so, so happy with how it turned out.

But I wasn't always so optimistic. I don't know if it was the volume of dough or its tougher than usual texture, but listening to my poor little kitchenaid mixer struggle through those first couple of minutes of kneading just made me sad, so I decided to roll up my sleeves and give it a rest and knead this dough by hand (see Dad, truly a labor of love!). It starts out pretty dry and not elastic at all, but 5 or 6 minutes of kneading later, you should have a softer, slightly more pliable dough. Mine was not as elastic as most other bread doughs I've made, and since this was my first time making it, I have no idea if that means something went wrong or not, but considering the end product, I don't really care.

Because what I sliced into on yesterday was perfect. The middle was light and fluffy, but the crust had just the right amount of chew. And the slight tang from the buttermilk reminded me so much of sourdough, that I knew instantly my dad would love it. This bread was so perfect I heated up the stove and made French Toast for breakfast. On a Tuesday.


Buttermilk Sandwich Bread
Yield: 2 loaves

Ingredients:
3/4 cup warm water (105-115 degrees F)
1 Tbsp instant yeast
1 tsp granulated sugar
1 1/2 cups buttermilk at room temperature
2 Tbsp unsalted butter, melted
3 Tbsp honey
6 cups bread flour, divided
1 Tbsp kosher salt
egg wash (1 egg plus a splash of water or milk and a pinch of salt)
Sesame seeds for topping (optional)

Directions:
1. In the bowl of a stand mixer, combine the warm water, yeast, and sugar. In a small bowl, combine the buttermilk, melted butter, and honey. Add to the yeast mixture.
2. To the bowl, add 4 cups of flour and the salt. You can begin with the paddle on low speed to get the dough going, or simply take the dough hook in your hand and manually mix it until it just comes to together. Add the remaining flour, 1/2 cup at a time.
3. Fit the mixer with the dough hook and knead on low speed (no higher than 2) for 5-6 minutes, until the dough is smooth and a little elastic (This is a tough dough. It will not have the same elasticity of many other bread doughs). Alternately, knead the dough by hand for 5-6 minutes.
4. Transfer the dough to a well oiled bowl and cover lightly with oil-coated plastic wrap. Let rise in a warm place for about 75 minutes.
5. Turn the dough onto a lightly floured surface and punch the dough down. Divide it in half with a sharp knife or bench scraper. Shape each piece of dough into desired shapes (braided loafs, boules, etc.) If using a loaf pan, grease it lightly. Cover the loaves lightly with oiled plastic wrap and let rise again for another 45 minutes. Meanwhile, preheat the oven to 375 degrees F.
6. Just prior to baking, brush the tops of the loaves with egg wash and sprinkle with poppy seeds. Bake 45 minutes, or until the bread is a golden brown. Let cool completely before slicing. Store at room temperature, wrapped in paper not plastic.

Recipe slightly adapted from Annie's Eats

Tuesday, December 20, 2011

Chocolate Cupcakes with Peppermint Frosting


What can I say? I like a theme.

To be honest, candy canes aren't really my thing. At least not the peppermint ones. Spearmint? Yes. Berry flavored? Ok. But peppermint? No.


Also chocolate and peppermint. Gag me. I think I'm the only person in America who hates Thin Mint cookies. Seriously, give me any other girl scout cookie, even the boring shortbread ones over Thin Mints any day.


Did I just lose you there? Have you lost all respect for me as a baker? Please don't. I can't help it. I like my chocolate unadulterated. I also like milk chocolate best of all. Not that intensely dark, bitter crap that tastes like chalk. Sorry, but why not get it all out on the table now?


Even though I can't stand it, I know chocolate and peppermint is generally a crowd pleaser, so when I was deciding what to bring to my old office, I thought what better to go with Candy Cane cookies than Candy Cane cupcakes.


Unfortunately, I'm still on the hunt to find the best chocolate cake recipe, and although these cupcakes were good, they weren't quite chocolatey enough for me. The texture was nice and light, but the depth of flavor just wasn't quite there. They almost reminded me more of a chocolate sponge cake than a Devil's Food, and the latter is really what I'm going for.


Chocolate Cupcakes
Yield: 24 cupcakes

Ingredients:
2 2/3 cups cake flour
6 Tbsp plus 1 tsp cocoa powder
1 tsp baking powder
1 tsp baking soda
1/2 tsp kosher salt
1 cup buttermilk
1 cup sour cream
1 1/2 cups granulated sugar
6 Tbsp unsalted butter, melted
3 eggs, lightly beaten

Peppermint Frosting
Ingredients:
1/2 lb (2 sticks) unsalted butter, softened
7 Tbsp vegetable shortening
2 cups powdered sugar
3/4 tsp peppermint extract, or to taste
Crushed candy canes to garnish (optional)

To make the cupcakes-
1. Preheat the oven to 350 degrees F. Line two cupcake tins with liners and set aside.
2. Sift the cake flour, cocoa powder, baking powder, baking soda, and salt into a large bowl. In a small bowl, combine the buttermilk and sour cream. Set both aside.
3. In the bowl of an electric mixer fitted with the paddle attachment, combine the sugar and butter. Mix until light. Add the eggs slowly, beating at medium speed until fully incorporated.
4. With the mixer on low speed, add the dry ingredients alternately with the buttermilk mixture, beginning and ending with the flour. Scrape down the sides as necessary.
5. Divide the batter evenly among the muffin cups. Bake for 17-20 minutes, or until a toothpick inserted in the center comes out clean. Let cool completely before frosting.

To make the frosting-
1. Cream the butter with the paddle attachment until soft. Add the shortening and continue to beat on medium speed until smooth and fluffy, scraping down the sides of the bowl as necessary.
2. Gradually add the sugar and beat on medium high speed until very light and fluffy.
3. Add the peppermint extract and mix just to incorporate.
4. Frost cupcakes and sprinkle with crushed candy canes.

Store the frosted cupcakes in the fridge, but serve at room temperature.

Recipe adapted from Thomas Keller's Ad Hoc at Home

Friday, December 16, 2011

Decorated Candy Cane Cookies


I finally get a day off from work, and what do I do? Bake! Obviously. Because I'm a glutton for punishment I've been wanting to bring some treats over to my old office and these decorated cookies seemed perfectly festive.


Instead of traditional sugar cookie dough, this is what I like to use when it comes to baking cookies for decorating. Taste is always what's most important to me when I'm baking, so it was really important for me to make cookies that not only looked pretty but also tasted great. These cookies are chocked full of buttery, brown sugary flavor, with that great balance of texture that's somewhere between a sugar cookie and shortbread.


I'm trying to get through all the holiday cookie cutters I have before it's too late, and these candy canes were the first on my list. I tried a few different designs but the stripes were my favorite. Unfortunately these pictures don't really show it, but on the red stripes I added shiny red sanding sugar.

To get the design, I outlined each cookie in white icing. I then outlined all the white stripes and filled them in with thinned white icing and let them dry overnight. The next morning I outlined the remaining empty stripes in red icing and filled those in too. Then, while the red icing was still wet, I sprinkled on the red sanding sugar and immediately tapped off the cookie to remove the excess.


Of course, if you really want to go all out, you can add a few drops of peppermint extract to the royal icing, so your cookies will not only look like candy canes, but will taste like them too!


Vanilla Cookie Dough
Yield: 20-24 large cookies

Ingredients:
15 oz all-purpose flour
1 tsp baking powder
1/2 tsp kosher salt
1 cup (2 sticks) unsalted butter, at room temperature
5.25 oz light brown sugar
1 egg
1 tsp vanilla extract


Directions:
1. Preheat oven to 350 degrees F. Line two baking sheets with parchment paper and set aside.
2. In a medium bowl, combine the flour, baking powder, and salt. Set aside.
3. In the bowl of an electric mixer fitted with the paddle attachment, cream the butter and brown sugar.
4. Add the egg and vanilla and increase the speed to incorporate.
5. With the mixer off, add all the dry ingredients. Mix on low speed until just incorporated. Divide the dough into two discs and chill until firm, about 15 minutes.
6. Working with one disc at a time, roll dough out on a lightly floured board to about 1/4'' thick. Cut out desired shapes with cookie cutters and space evenly on prepared baking sheets. Re-wrap any scraps and chill another 15 minutes before re-rolling again. Discard any remaining scraps.
7. Bake 10-12 minutes, or until the edges of the cookies just begin to turn golden brown. Allow to cool completely before decorating with royal icing.

Royal Icing:
3 egg whites
18 oz powdered sugar

Whisk egg whites until foamy. Gradually add sugar and whisk until incorporated. Outline cookies, then thin icing with water, 1/2 tsp at a time, until it is the consistency of thick syrup, before flooding.

Recipe Notes:
  • Only re-roll your dough once. Work with the dough too much and you won't have tender cookies.
  • Don't feel like decorating? Try dipping half of each cookie in melted chocolate, or just enjoy them plain!

Thursday, December 15, 2011

Oohh, we're halfway there!

 Oh you know, just serving more than 2,000 petit fours for just one of many events. No biggie.

Ok, I told you I'd be busy. I didn't say I was going to drop off the face of the blog world earth. Sorry for the disappearing act. Thankfully December is now half over, which means only one or two more weeks of craziness and then hopefully things will calm down a bit at work and I'll be able to do more fun cooking here.

Actually I have the day off tomorrow so there are currently three, yes THREE different kinds of icing in my kitchen at the moment. Check back soon to see what I'll be doing with them!

Friday, December 9, 2011

Jacque Torres' Chocolate Chip Cookies


Sometimes you need something ridiculous. Like chocolate covered whiskey bacon bark. Yes, that is a real thing. I saw it on Pinterest and everything on Pinterest is real. But sometimes, you just want a cookie. A warm, ooey, gooey, comforting chocolate chip cookie. And that's exactly what I wanted last week when I was craving something sweet. 

For some reason the Jacque Torres chocolate chip cookie had popped back up on my radar recently so I figured I'd give it a shot since it's been touted as the cookie to end all cookies. Oh really, Jacque? We'll see about that. (Fangirl moment: I've had the opportunity to meet Jacque Torres twice, and the first time he told me I needed to eat more pastry. Done and done.) 


So there are two things that make this recipe unique- it uses cake and bread flour instead of all-purpose, and it requires you to rest the dough at least 24 hours before baking. Of course, since I was just making these for my own enjoyment, I decided to do a little test. I had both flours in my pantry, and although I think it's a bit of a gimmick, I went ahead and used both as the recipe calls for. 

The reason I think this is a little silly is because bread flour and cake flour essentially cancel each other out. Confused? Let me explain. Bread flour has a high gluten or protein content, which means it creates a tougher product, but something that is strong enough that can withstand the rising effect of yeast or pate a choux


Cake flour has a lower gluten content, which results in a nice, tender fluffy cake. All-purpose flour has a gluten content somewhere in the middle, which is why it is used so often. So essentially, using equal amounts of cake and bread flour cancel each other out and you end up with something much closer to all-purpose. But fine Chef Torres, I'll give you this one since I have all kinds of flours stocked in my pantry. Except whole wheat because, no.

So with both flours covered I set my sights on this "resting time." I have definitely come across doughs and batters that are best used after resting (madelines, crepes, etc.), but a cookie dough? There are no flavors that need melding or developing. The only reason I can come up with has to do with the bread flour. Gluten makes products tough, and the more you work with it, the tougher it gets (hence adding all the dry ingredients last in pretty much any cake or cookie recipe; you want to work that flour as little as possible!), but this rest period was supposed to enhance the texture and flavor. Obviously there was only one option: bake one now, bake one later, and compare.


This one I baked after just three hours of resting the dough in the fridge. Admittedly, I overbaked it just a smidge, but it was still good. Just your everyday, basic chocolate chip cookie. Honestly, nothing too special. 

Twenty-four hours later I scooped and baked the rest of the dough. And fifteen minutes out of the oven, these even looked better than the ones I baked the day before. I mean, come on, does this not look like the most perfect chocolate chip cookie you've ever seen? 


And I will admit, there was a definite improvement in overall flavor and texture. They were perfectly soft and chewy, rich and buttery, with just that hint of salt that I love in a chocolate chip cookie. I'd say these rank up there as one of the best chocolate chip cookies I've made, and will probably now take the spot of my go-to recipe. Are they the best I've ever tasted? Sorry, that honor is still held by Levain Bakery on the Upper West Side in Manhattan. Their cookies are the size of your fist and are so popular, it's almost impossible to buy one that's not hot from the oven and still all melty and gooey inside.

I did make one little tweak to the recipe. The original (or at least the New York Times version) calls for more than a pound of chocolate (20 oz to be exact). I know you never thought you would hear me say this, but that's just too much chocolate for me. I love chocolate chip cookies, but if I could eat around all that chocolate (like I do with the Keebler rainbow chip cookies), I would be a happy girl. See, I want to be able to taste the cookie, not just the chocolate. So for me, reducing the chocolate in this recipe was a no brainer. 
 

Jacque Torres' Chocolate Chip Cookies
Yield: 32 cookies

Ingredients:
8.5 oz (2 cups minus 2 Tbsp) cake flour
8.5 oz (1 2/3 cups) bread flour
1 1/4 tsp baking soda
1 1/2 tsp baking powder
1 1/2 tsp kosher salt
2 1/2 sticks unsalted butter, softened
10 oz (1 1/4 cups) light brown sugar
8 oz (1 cup plus 2 Tbsp) granulated sugar
2 eggs
2 tsp vanilla extract
1 lb bittersweet chocolate chopped, chips, or chunks
Sea salt (optional)
 
Directions:
1. In a medium bowl, whisk together both flours, baking soda, baking powder, and salt. Set aside.
2. In the bowl of an electric mixer fitted with the paddle attachment, cream together the butter and both sugars on medium speed (Speed 4) until very light and creamy, about 5 minutes.
3. Scrape down the bowl and add eggs one at a time, beating at medium speed until incorporated. Add in vanilla.
4. With mixer off, add all dry ingredients. Mix on low speed until just incorporated. Add chocolate and fold in by hand. 
5. Press plastic wrap directly onto dough and chill for at least 24 hours or up to 72 hours.
6. When ready to bake, preheat oven to 350 degrees. Line 2 baking sheets with parchment paper or a silpat. Set aside.
7. Scoop cookies into 2 oz balls (about the size of a golf ball) and space evenly on baking sheets. Sprinkle lightly with sea salt (optional) and bake until golden brown but still soft, 14-16 minutes. Cool cookies on baking sheets for 10 minutes, then transfer to a wire rack to cool more. Serve warm or at room temperature. Store at room temperature in an airtight container for up to a week.

Recipe Notes
  • I am impatient and have a bad habit of not letting my mixer go long enough. You want the butter and sugar mixture to be nice and smooth and creamy, so go do something else while it beats. Unload the dishwasher, take out the trash, something to distract you so you're not hovering over the bowl wondering when you can turn it off.
  • I highly recommend using the sea salt!
  • I used a scale to measure my ingredients, so the measurement approximations in parentheses are from the NYT, not my own.


Recipe adapted from Jacque Torres courtesy of The New York Times
Related Posts Plugin for WordPress, Blogger...