Monday, December 28, 2009

Tomato and Goat Cheese Tarts

When I look back and think of these, one thing comes to mind: cheese.

Cheese is one of those things that I could eat all day everyday. Kind of like chocolate. Of course, if I did that, I would weigh 9,000 pounds and wouldn't be able to get out of bed. So I resist.

Like my mother, I am cursed with loving most kinds of cheeses. There are very few cheeses I've met and haven't liked (except Swiss, blegh), but goat cheese and I have a fickle relationship. For example, fried goat cheese on a salad? Don't mind if I do. But spreading goat cheese on a crostini feels like I've coated my mouth in glue. So although these goat cheese tarts sounded good in theory, I was somewhat skeptical about the finished product.

They begin as so many blissful things begin, with puff pastry:


After rolling out a defrosted sheet of puff pastry to about an 11'' square, I cut out two circles, each approximately six inches in size, using the top of a blender as a guide (how thrifty am I?). I repeated with the second sheet of puff pastry so that I had four circles. I put these circles on a parchment-lined sheet pan and placed them in the refrigerator to keep cool.


Although the recipe says these should be split between two sheet pans, they all fit onto one, leading me to believe that they were a little smaller than the supposed six inches, but they looked like a good size to me, so I wasn't too concerned. Plus, it meant one less pan to wash.

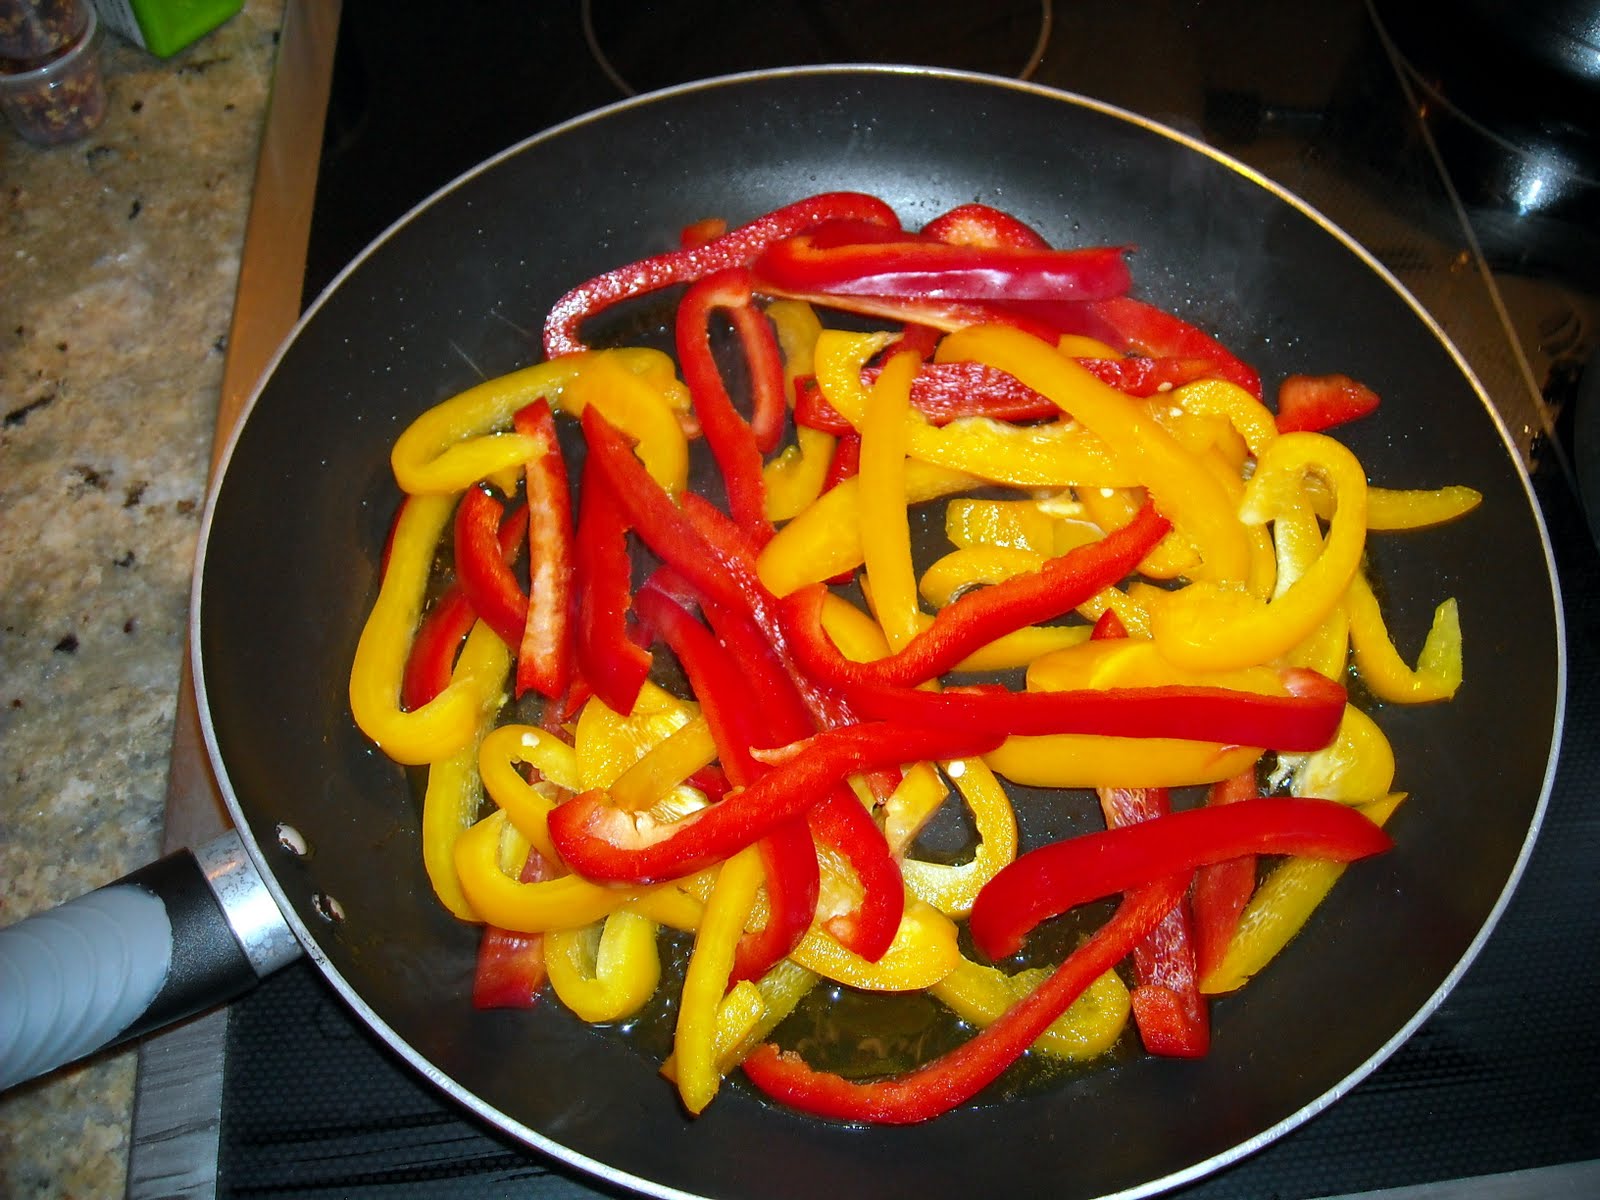
At this point, I preheated the oven to 425 and heated some olive oil in a large skillet. I added the onions and garlic:


and sauteed them over a relatively low heat for probably about 25 minutes, stirring frequently, until they were limp and there was little moisture left in the pan.


At that point, I added salt, pepper, white wine, and fresh thyme to the pan and continued to cook until the onions had started to caremalize and turn light brown.

For some inexplicable reason, Ina estimates this to take 10 minutes. Silly Ina. This took me another 25 minutes, at least. And caramelizing onions is one of those things that you just can't rush. Maybe I had the heat way too low, but I've caramelized onions many times before so I'm pretty familiar with the process. Perhaps Ina's onions are just magical and cook more quickly than your everyday, average grocery store onions. You know, kind of like her baking potatoes.

In the meantime though, between stirs, I prepped the rest of the ingredients:

herbed goat cheese, basil, Parmesan cheese, tomato  

and did some work to the pastry circles. Using a paring knife, I scored a 1/4 inch border around the edge of each circle. Inside this scored border, I pricked the pastry with a fork


and sprinkled about a tablespoon of Parmesan cheese in the center:


By this point the onions had finally caramelized lightly:


I added about 1/4 of the mixture to each pastry circle, again, staying within the scored edge:


On top of the onions, I crumbled about an ounce of the herbed goat cheese:

Trying not to get goat cheese all over my camera

Since I was using smaller, plum tomatoes instead of the larger variety which aren't very flavorful this time of year, I placed two slices of tomato on each tart instead of the one the recipe calls for:


After drizzling some olive oil over the tomato, I sprinkled it with the julienned basil, salt, and pepper:


Finally, I topped off the tarts with about 5 shards of shaved Parmesan cheese each:


These baked in the oven for about 25 minutes until the crust had puffed and all the cheese had melted. I served them alongside a simple green salad:


We could hardly wait to dig into these, although we probably should have since the hot goat cheese was more like molten lava than a dairy product. But once we got the feeling back in our tongues we really enjoyed these. Although the serving suggestion allots one tart per person, I assumed Dan and I would each want two since we were having them for dinner instead of lunch or an appetizer. But these were so rich, we both could only eat about one-and-a-half. The goat cheese wasn't overpowering due to the onion base, and the freshness of the tomato really helped to balance everything out. Tomatoes are yet another thing at which I usually gawk in disgust, but they were absolutely necessary in this recipe, and lightly roasting them gave them a not unpleasant flavor. Of course the flaky puff pastry dough was divine as usual, but you already knew that, didn't you? 

Make this when: your brother brings home his vegetarian girlfriend and you need an appetizer that's somewhat hearty since you're serving Garlic and Citrus Chicken as the entree. 

Next Course: French Bistro Steaks with Provencal Butter

Monday, December 21, 2009

Tri-Berry Oven Pancakes

For my next trick, I'm going to turn an ordinary everyday pancake into something extraordinary, something exquisite and delicious, truly worthy of being served on a silver tray to someone dining on breakfast in bed.

Basically this was a glorified popover recipe. For those of you who aren't my sister and have maybe never had a popover, this is what they look like:

Image courtesy of whatscookingamerica.net

They're made using an egg-rich batter, and if you've ever watched popovers (from outside the oven of course, because under no circumstances should you open the oven door one second before they're done) they do much the same thing as these pancakes did. The outside of the popovers rise before the middle does, but because of the shape of the popover pan, the middle eventually rises as well. Well, when using a shallow gratin dish instead, something completely different happens.

But listen to me rattling on about popovers when this post isn't about popovers; it's about pancakes so let's get to it. First, the ingredients:

butter, eggs, milk, flour, vanilla extract, orange zest, salt

In addition to these, there were also a 1/2 pint each of raspberries, blueberries, and sliced strawberries, which I gently combined in a bowl with some sugar:

Surprisingly, even though I made this in the fall, the berries were still pretty good

I set the berries aside to macerate and preheated the oven. Using the same gratin dishes I used for the Bay Scallop Gratins, I divided all four between two sheet pans and placed a teaspoon of butter in each dish.

Using a whisk, I combined the eggs and milk. I slowly added the flour, vanilla, orange zest, melted butter, and salt. I poured the batter, which was pretty thin, into a medium-sized measuring cup to make it easier to pour:


Once the batter was ready, I did the same thing I would have done with a popover pan. I put the gratin dishes in the oven to melt the butter and preheat the dishes:


This took about 3 minutes. Once the butter was hot and bubbly, I took the dishes out. The melted butter needed to cover the bottom of each dish, but it had sort of pooled to one side, so I had to try and swirl each one to coat the bottom. This was easier said than done since the dishes were all 425 degrees and I was trying to work quickly. Once each dish was pretty well coated, I divided the batter equally among the four dishes:


The pancakes baked for about 12 minutes until they were puffed and lightly browned. I was so sure these would fall flat on their face, but lo and behold, they rose beautifully!

ta DAAAA!!

Since the dishes were split between two sheet pans, one of the pans had to be on the bottom rack, so they took a few extra minutes, but they turned out beautifully as well. How beautiful, you ask? Ummm...

Hi.

Hello.

As you can see, once the pancakes were out of the oven, I divided the berries, which were now a little juicy and very sweet thanks to the sugar, evenly among them. This sweetness cut through the egginess of the batter, which was something I was worried about given that I really don't like eggs.

These were so freaking delicious, you would not believe it. I'm getting excited just writing about them.

You all: Ugh Morgan, we're just so impressed that you got up early and made this fancy breakfast. I mean, could you be any more awesome? 

Me: Oh please, it was nothing. A little flour, a little butter. Psh.

Ok, full disclosure: I actually made these for dinner. Anyone who knows me knows I am not a morning person. And although I do love breakfast, especially pancakes, there was no way I was dragging myself out of bed before 10 to get these things in the oven. But I made the full recipe which serves 4 for breakfast, and it turned into an awesome dinner for 2. Just look at how pretty our table looked:

Please note the other 2 pancakes waiting to be devoured in the background.

I added some warm maple syrup to mine which was D-lish, but Dan had his straight up with the berries and their yummy juices. Ideally, I also would have dusted these with some confectioner's sugar to make them even prettier, but we didn't have any.

And I must say, those gratin dishes were well worth it. When I first bought them, I was a little concerned I would use them once and then they would sort of be the odd things that I always wanted to use but could never find a use for. But I will definitely use them over and over again if for nothing else, than just for these delicious creations. 

Make this when: you're making someone breakfast in bed. The batter comes together really quickly so you won't have to wake up super early. And while the pancakes are in the oven you can crisp up some bacon and whip up a mimosa.

Next Course: Tomato and Goat Cheese Tarts

Thursday, December 10, 2009

Date Nut Spice Bread

I'm sorry it's been so long since my last post, but there's been yet another change in my life...

Drum roll please.......

I've moved! I'm now living in a house with three other girls, all of whom are students, but are around my age. So, soon in pictures, you'll start to see parts of my new kitchen! I'm also excited that I'll actually have more people to cook for now. It was kind of depressing making a recipe designed for six and having to pare it down for two for just Dan and me. But in all the chaos of moving I've become a tad delinquent in posting so the next few recipes I made while I was still cooking in Dan's kitchen. But hopefully I'll get cookin' in my new kitchen soon!

Ok, on to the Date Nut Bread!

This didn't start well. Not well at all.

The first thing I did was chop a bunch of dates and soak them in Triple Sec:


So I'm on my merry way, chopping and soaking, soaking and chopping, and I get my brand new loaf pan out of the cabinet...and it's too big. Like two times too big.

Commence absurdly over reactive freak out...... now. There was some yelling, some cursing, some threats to throw away the pan, and a violent thrust of the Triple Sec-soaked dates down the garbage disposal.

Fast forward to a little while later, after a trip to Target to procure the correct size loaf pan and some more dates, and let's try this again.

I did the same chopping and soaking routine as before, preheated the oven, buttered the *correct* loaf pan, and gathered all my ingredients:

butter, light brown sugar, egg, vanilla, orange zest and juice, flour, baking powder, 
baking soda, cinnamon, nutmeg, ground cloves, salt, pecans, cream cheese, sugar
(I also floured the loaf pan, but obviously after this picture was taken) 

Using a hand held mixer (my fav), I creamed the butter and brown sugar:


Next, I added the egg, vanilla, and orange zest:

amazing the difference one egg can make 

In a separate bowl, I sifted together all the dry ingredients, including the spices. I added about a third of the dry ingredients to the butter-sugar mixture and combined. Next, I added half the orange juice, and continued to add ingredients in that order, ending with the flour mixture, until the batter looked something like this:


By this time, 30 minutes had passed so the dates (which I had been stirring occasionally) were ready to be added along with the accompanying Triple Sec and the chopped pecans:

Before:
   
After:
This had to be stirred by hand 

I poured the batter into the prepared loaf pan:

 
and put it into the oven to bake. In the meantime, I made the accoutrement: an orange-cream cheese spread. I put all ingredients into a bowl:

cream cheese, orange zest, sugar 

and whipped them with the electric mixer until they were smooth and combined:

a little blurry, sorry! 

By this time, the bread had been in the oven for a little while and the whole house was smelling like Christmas, or what I would imagine Christmas would smell like if I celebrated it. Finally, the bread was done and out of the oven it came:

It cooled in the pan for about 10 minutes, and then cooled completely on the rack 

And here's the very simple plating:


I have to say, the best part of this dish was the cream cheese spread, probably because it was basically the cream cheese frosting that you eat on carrot cake. Even though I baked the loaf for the suggested time, I thought it was a bit dry or overcooked. And although I've learned to like dates, these were a little too overpowering, maybe because I hadn't chopped them small enough. Dan was really the one who ate the majority of the loaf, and I think it actually got better as it sat for a day or two in the fridge. But for me, the loaf was really just a vessel for the cream cheese. 

Make this when: you're asked to bring something to a bake sale and you don't want to bring just another boring bundt cake. Plus, if you don't like it, someone else will buy it so you won't have to eat it. But be sure to include the cream cheese spread because to leave out the best part would just be mean. 

Next Course: Tri-Berry Oven Pancakes

Thursday, December 3, 2009

Parmesan-Roasted Broccoli

Scene: Ukrops, Monday night, weekly grocery shopping
Me: We need about 2 pounds of broccoli. 
Dan: What, why?! That's way too much. What are we going to do, just eat a ton of broccoli and nothing else????? 
Me: Don't get hysterical. I'm going by what the recipe says and it says 2 pounds makes 3 servings. 
Dan: *Picks up 1 small head of broccoli (weighing less than a pound) and puts in cart*

Boy did he regret that decision later...

I know I tend to go on and on about all the things I don't like or refuse to eat, but broccoli is one of the few veggies I really like. I will say though that I am partial to the tops. I was a little skeptical about roasting it in the oven for this recipe since one of my roommates used to cook it this way, but it always resulted in a sort of funny smell and brown-tipped broccoli which wasn't too appetizing. Nevertheless, once we got home from the store, I preheated the oven and got all my ingredients together:

  broccoli, garlic, olive oil, salt, pepper, lemon, pine nuts, Parmesan cheese, basil

I cut the florets away from the big stalk, but tried to leave about an inch of the thinner stalk attached. Since this head of broccoli was small (ahem), this was a little challenging, but I did my best and put the broccoli florets on a baking sheet:


I sliced the garlic cloves thinly and added them to the sheet pan. I drizzled the broccoli and garlic with olive oil, sprinkled with salt and pepper, and tossed everything to combine. I tried to strategically place the garlic slices on top of the broccoli pieces to impart as much garlic flavor into the vegetables as possible:


I put the pan in the oven and set the timer for about 20 minutes. While they roasted, I toasted the pine nuts in a dry pan, zested and juiced the lemon, julienned the basil, and grated the Parmesan. Once the broccoli was crisp and tender and the florets were browned, I removed the pan from the oven:

  Just a tad too brown

As soon as the broccoli was out of the oven, I put it in a bowl and tossed it with more olive oil, the lemon zest and juice, pine nuts, Parmesan and basil. I also added a little more cheese to the top once it was plated:

Ready for my close up, Mr. Demille

Despite the fact that the broccoli was just slightly crispier than it should have been, this was really delicious. Dan even went so far as to say it was the best thing I had cooked yet. Then I reminded him about the Indonesian Grilled Swordfish and he reconsidered. But this was a close second and was probably the best veggie dish I've made so far.

The lemon, basil, and Parmesan really escalated the flavor of the broccoli and turned something ordinary into something really special. I mean, this was the best broccoli I have ever had. Really. It was complex, balanced, and flavorful, and you could still enjoy the broccoli's flavor without it being smothered in thick hollandaise or cheese sauce. 

Me: So Dan, enjoying your broccoli over there?
Dan: *Mouth too full to talk* 
Me: Bet you're wishing you had listened to me back there in Ukrops, huh? 
Dan: *Pauses, with mouth still full* Yeffshh...  
Me: *Defends own plate of broccoli with fork* 

Make this when: you've put on about 5 pounds of Christmas cookie weight and need to add more veggies to your diet so other people's kids will stop calling you Santa/Mrs. Clause. The broccoli cancels out the cheese...and nuts...right? 

Next Course: Date Nut Spice Bread

Tuesday, December 1, 2009

Thanksgiving- A Family Affair

I know Parmesan-Roasted Broccoli is scheduled to be this next post, but in honor of the Thanksgiving holiday, I'm skipping ahead a bit and posting about the dishes I made for and with my fam. Also, in honor of the ultimate family holiday and my personal favorite, there were a few more blondes in the kitchen with me helping to make this one of our tastiest Thanksgivings yet.

I'll resist detailing our whole menu since drool and computer keyboards don't really mix, but I'll of course tell you all about the dishes I made from Back to Basics. For one of our desserts, I made the French Apple Tart, which was a big hit as always, but since I already blogged about it, I'll move on to the new recipes. The two recipes I made were appetizers, and the first was a Roasted Shrimp Cocktail. I will admit, I made this recipe long before Ina published her most recent cookbook, but I've found it's one of the most impressive ones for people who like shrimp cocktail. Ina is all about turning up the volume on classic dishes, and you're going to need earplugs for this one.

We started with 2 pounds of shrimp, which my grandmother diligently peeled, cleaned and deveined. That's right, I let her have the lovely task of peeling the outer layer off of a dead crustacean and then slicing its back open to remove its innards.

Are you drooling yet?

I unfortunately forgot to tell my grandmother to leave the tails on, so you'll notice in pictures that these little guys are missing them, although considering the speed with which they were ingested, they probably would have just slowed people down. Once they were nice and clean, I spread the shrimp out on a foil-lined sheet pan:


Ok, so my mom was actually the one that did this, but I supervised. Next, we (read: my mom) tossed the shrimp with olive oil:


Hi Mom! And there's my sister, Alex in the background 

Last was to arrange the shrimp in a single layer and sprinkle them with salt and pepper:


and into the oven they went for just a few minutes. In the meantime, we (read: my mom, again) made the cocktail sauce. I regret that my photographer (me) was seriously slacking off during this time, so unfortunately there are no photos of this process, but really guys, how hard is it to make cocktail sauce? No, we didn't make our own ketchup or use fresh horseradish. We basically just took a bunch of stuff from jars and bottles and combined it all together into a big container:


chili sauce, ketchup, prepared horseradish, lemon juice, 
Worcestershire sauce, and Tabasco 

Once the shrimp were fully cooked, I took them out of the oven and allowed them to cool:


The shrimp and the cocktail sauce went into the fridge to chill overnight and when it was time for appetizers before the big Thanksgiving feast, my sister created a lovely arrangement:

See, you don't even miss those pesky tails

 You: So Morgan, you basically made your grandmother, mother, and sister do all the work for this and you just sat back and took pictures? 
Me:  ...Basically. 

And as always, these were a huge hit. The difference that roasting the shrimp makes is incredible; people just go nuts because all they're used to is the typical boiled shrimp which I gather can be sort of bland and easily overcooked.

Make this when: you're hosting a holiday party for your co-workers. You'll knock their stockings off and it can be made the day before. As Ina would say, how easy is that? 

Next Course: Bruschetta with Peppers and Gorgonzola

Since my sous chefs were mostly busy either cooking, eating, or both by the time I started the bruschetta, I was left mostly to my own devices. To start, in a large skillet, I sauteed strips of yellow and red bell peppers:


While these were sauteing, my sister made the mistake of wandering into the kitchen, so I of course commandeered her to help, delegating to her the task of slicing a french baguette into individual crostinis:

That's about as far as she got before handing the knife over to her boyfriend, 
Chance, to finish the job. 

After about 12 minutes in the pan, I sprinkled the peppers with sugar, and sauteed them for another 3 minutes:


Finally, I stirred in julienned fresh basil, capers, salt, and pepper and set the pan aside:


Luckily, I had just come to this stopping point when we got the 5 minute warning. For what, you might ask? Brace yourselves for...
The Turkey Fryer!!
DUM DUM DUUUMMMMM  

That's right ladies and gentlemen, this year we truly embraced our "Southern" roots and deep fried a turkey. We'd been talking about it for years and this year was THE year. So all of those not willing to risk our lives or eyebrows gathered on the deck (a.k.a. a safe distance away from the searing hot vat of oil) and watched...

It's going...

and going...
annnddd....
It's in!!

Once we were pretty sure the house wasn't going to catch fire, we went back to the kitchen and kept a' cookin. To finish the bruschetta, I brushed each slice of bread with olive oil and toasted them in the oven for just a few minutes. Using tongs, I topped each slice with a little of the pepper mixture and then dotted each with the gorgonzola. I returned them to the oven for another few minutes just to warm the cheese:


Even the smell of red bell peppers usually make me gag, so I was super skeptical of this dish. But once they were ready, I was so distracted cooking all of my other dishes for dinner, I forgot to try one! Oh no, I thought, this will be the one thing that I've made so far that I didn't even try! Well...besides the shrimp that is. But, as luck would have it, when the appetizer plates were cleared there was one little bruschetta left that had my name on it. Conveniently, it even had just the yellow peppers, and was really good. I loved the combination of the creamy cheese and fresh-tasting bell pepper, and basil just makes everything better. Unfortunately, I don't think my piece had any capers on it, but I can only believe that they would have added the touch of salt and vinegar that would have complimented the rest of the bite nicely. 

Make this when: one of your friends has something to celebrate and you've volunteered to host the cocktail hour before a fun night out on the town.

Next Course: Parmesan-Roasted Broccoli

Oh, and in case you're wondering how the fried turkey came out, it was pretty good. I'm sorry I didn't get a picture of it, but I'll supplement with our beautiful table instead:

 Courtesy of Alex and Chance 

The fried turkey was successfully cooked all the way through and had a really pretty, crispy brown skin, and thankfully, no one and nothing was set on fire. Since we weren't going to put all our turkeys in one fryer...if you will...my mom also made a 17-pound fresh turkey that she covered in herb butter and then practically soaked in butter and wine. There was some debate as to which turkey was the favorite, but for me, there was no competition. I thought the fried turkey was a little dry, and come on, butter and wine? What could be better than that?
Related Posts Plugin for WordPress, Blogger...