Showing posts with label breakfast. Show all posts

Sunday, January 1, 2012

Bangin' French Toast


It's a new year! Time for trying new things and making resolutions.

Perhaps you made a resolution to bake fresh bread.


Or make breakfast every morning. Or both. In which case, this recipe is perfect for you. Because the first thing you're going to want to do when you wake up with fresh bread in your house, is coat it in custard, fry it up in some melted butter, and drown it in maple syrup.


Good thing we didn't resolve to lose weight.

Now, normally I'm not a fan of french toast. It's the eggs. I just can't stand egg-y french toast, but we're trying new things, remember! And this slightly thinner, sweet, vanilla-spiked custard is just right. I particularly love to use a sweet bread for this like challah, brioche, or even something with dried fruit in it like pannetone, but you can really use anything that's thickly sliced. I used Buttermilk Sandwich Bread and it was awesome. Dan Some might even call it... bangin'.


Bangin' French Toast
Yield: 2 Servings

Ingredients:
2 eggs
1/4 cup whole milk
1 1/2 tsp granulated sugar
1 tsp vanilla extract
4 thick slices bread
4 Tbsp unsalted butter
Warm maple syrup 

Directions:
1. In a small bowl, whisk together the eggs, milk, sugar, and vanilla.
2. Heat a large saute pan over medium heat. Add butter and heat until it is melted.
3. Dip each slice of bread into the custard mixture, coating both sides. Allow the excess to drip off, or use your fingers or a fork to remove any excess.
4. Add the bread slices to the saute pan and toast until golden brown. Use a small spatula to lift up the corners of the bread to check how they're cooking. Flip the slices and brown the other side as well. Serve immediately with warm maple syrup.

Recipe Notes:
  • If you can't fit all 4 slices of bread in the saute pan at once, only use half the butter to start, and continue to add more as you add more bread slices.
  • You want your bread to toast and brown, so if it seems to be browning too quickly, before the bread is really toasting through, turn the heat down to med-low and continue to cook until desired doneness.
  • If making more than one batch, I stack the already cooked french toast on a plate and just leave them in the microwave. No need to turn it on; the heat from the warm toast will create a little oven!


Friday, October 28, 2011

Morning Fruit Smoothie


Are you wondering why you're looking at a bowl of ice cream in a post about a smoothie? Well, two reasons: 1) the leftovers of this smoothie can totally be frozen and eaten for dessert. Hello tropical fruit sorbet; and 2) I completely forgot I was supposed to photograph the smoothie this morning until I was about halfway finished with it. Whoops. But now you get two recipes in one! Exciting, I know.

Now, I know I don't need to tell you how to make a smoothie. I mean, put things in blender. Blend. Not complicated. And I'm not trying to tell you that this is the perfect combo. Maybe you like 3 bananas instead of one. Maybe you're into pineapple juice. Ooh, or a pineapple orange blend, mmm. This is just the current combination that I'm into. It's also the only way I will allow a banana to get past my gums. We all make allowances.

Morning Fruit Smoothie
Yield: 2 servings

Ingredients:
2-3 ice cubes
1 banana
1/3 cup plain yogurt (nonfat, greek, frozen, etc.)
1 cup Frozen fruit (I used about 1/3 raspberries and 2/3 mango)
1/2- 1 cup orange juice
1 squeeze honey
1 scoop vanilla protein powder (optional)

Directions:
1. Place all ingredients into a blender. I piled in the frozen things on the bottom, topping them with (frozen) yogurt, honey, and lastly half the juice.
2. Blend on high, stopping to stir occasionally. Add more juice as necessary to reach desired consistency.
3. Serve immediately or freeze in an airtight container.

Thursday, October 13, 2011

S'mores Croissant Bread Pudding


When I heard we were serving a version of this at work for Sunday brunch, I started to sweat a little. For someone who doesn't like bread pudding, even I thought this sounded amazing. So I was not looking forward to Sunday when I had a feeling we'd be faced with a hungry crowd of guests and no more s'mores bread pudding to serve them. Thankfully, that wasn't the case and I came away with another great idea for Break Fast for Yom Kippur.

This was definitely the show stopper on our buffet. The marshmallows sort of melt leaving their great sugary flavor behind, but adding just that slight chew that comes from an ooey gooey marshmallow. But what really makes this bread pudding so great (and something I actually like) is the croissants. They add a buttery richness and decadence to the pudding that is seriously magical. Plus, the texture is so different than your typical bread pudding. No soggy bread here!

Bread pudding is very versatile. It's great to serve to a group, and can be served as dessert after dinner or as the main course at a special brunch. There are endless flavor and add-in combinations so you're sure to find something that everyone will like. Even if they think they don't like bread pudding.


S'mores Croissant Bread Pudding
Yield: 10-12 servings

Ingredients:
4 eggs
12 egg yolks
2 1/4 cups granulated sugar
5 cups half-and-half
2 tsp vanilla extract
10 croissants, stale or toasted
2 cups chocolate chips
1 1/2 cups mini marshmallows

Directions:
1. In a large bowl, whisk together the whole eggs, egg yolks, and sugar. Add the half-and-half and vanilla. Set the custard mixture aside.
2. Cut the croissants into about 8 pieces each and put into a large bowl. Pour the custard over the croissants and add the marshmallows and chocolate chips, mixing so everything is well combined. Allow to soak for at least four hours or overnight.
3. Preheat oven to 350 degrees F. Grease a large casserole dish or 9x13'' baking dish. Pour the croissant mixture into the baking dish. Bake for 45 minutes to an hour or until the pudding puffs up and the custard is set. Remove from the oven and cool slightly. Serve warm or at room temperature.

Recipe Notes
  • Watch the bread pudding toward the end of the cooking process. If the top or edges start to get too brown before the custard is set, cover with foil and continue to cook.
  • You can use the custard recipe as a base and sub in different garnishes: 1 cup raisins or dried fruit, toasted nuts, fresh berries, etc.
  • For chocolate bread pudding, add a few tablespoons of cocoa powder to the custard. Other additions: nutella, peanut butter, butterscotch chips and caramel sauce, cinnamon and apples. The options are endless!
Recipe adapted from Ina Garten

Wednesday, October 12, 2011

Spinach Quiche


Given my hatred for all things eggy, you'd think quiche would be an obvious No. But something about the flaky, crunchy crust and all the cheese...it just works. I have a feeling the same could be said for someone who hates spinach. Serve them a slice of this pie and really, who could resist? I actually think what absolutely makes this is the smoked gouda. The smokiness isn't overwhelming, it just adds a little more depth to the whole thing. This is also my go-to pie crust for everything, sweet or savory. It's really easy to make and always comes out buttery and flaky. If you don't have a food processor, don't panic! You can cut in the butter for the crust by hand using a pastry cutter or a fork. Then just add the water little by little, kneading as you go. And as for the filling, just mix it up by hand.

This is what's considered a two-step pie, meaning the first step is to bake the crust by itself, and the second step is to bake the filling. If you've never blind-baked a pie crust before, it's really simple. Just follow these steps:

Start with a chilled, unbaked pie shell.

Tear off a piece of parchment paper a little larger than the size of your pie dish. Fold it in half and in half again. Identify the corner all the folds center around.

Fold the paper again bringing the corner on the right to meet the corner on the left, forming a triangle. Repeat.

Place that point (the one I've had my finger on) over the middle of your unbaked pie shell.

Cut off any excess paper, with the point in the middle, so the edge of the paper is just about at the edge of the pie shell.

Now unfold our parchment. You should be left with a pleated circle big enough to fit into your pie shell with some excess overhang. Fill with pie weights or dried beans and bake!

Spinach Quiche
Yield: 12 servings

Ingredients:
For the crust:
1 1/4 cups all-purpose flour
1/2 tsp granulated sugar
1/2 tsp kosher salt
1 stick unsalted butter, very cold, diced in to small pieces
1/4 cup ice water

For the Filling:
1 cup (8 oz) smoked gouda, cut into pieces
1 10 oz package frozen spinach, thawed and squeezed dry
2 eggs
2 yolks
1 1/4 cups half-and-half
1/4 tsp salt
1/4 tsp pepper
Pinch freshly grated nutmeg
Grated parmesan cheese

1. First, make the dough for the crust. In the bowl of a food processor fitted with the steel blade, pulse together the flour, sugar, and salt. Add the butter and pulse until the butter is the size of small peas. Through the feed tube, slowly pour the ice water with the processor running. Pulse intermittently until the dough starts to hold together. If it seems to dry, add additional ice water, 1 tablespoon at a time. Onto a floured surface, dump the dough and form into a flattened disc. Wrap well and refrigerate for at least 1 hour.
2. Preheat oven to 375. Roll dough to 1/4'' thick and fit into a 9-10'' pie plate. Line pastry with parchment and fill with pie weights. Bake until crust is set, about 12  minutes. Remove pie weights and parchment and bake an additional 5 minutes or until the bottom is dry and the crust's edge is lightly golden. Remove from oven and set aside. Keep oven on.
3. In the food processor, pulse gouda until finely chopped. Add spinach, eggs and yolks, half-and-half, and spices. Process until well combined, about 30 seconds.
4. Pour quiche filling into the prepared crust. Sprinkle some parmesan cheese on top.
5. Bake quiche for 40-45 minutes until custard is golden, puffed, and set. Let cool at least 15 minutes before serving.

Recipe Notes
  • I forgot the Parmesan cheese and it was still great.
  • To make this even more hearty, add some cooked, crumbled bacon to the bottom of the pie shell before pouring in the filling.
  • It is very important to let this rest before serving! Cutting it too soon could result in runny slices.
 Crust recipe from Martha Stewart. Quiche recipe adapted from Emeril Lagasse 


Monday, December 21, 2009

Tri-Berry Oven Pancakes

For my next trick, I'm going to turn an ordinary everyday pancake into something extraordinary, something exquisite and delicious, truly worthy of being served on a silver tray to someone dining on breakfast in bed.

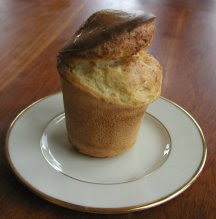
Basically this was a glorified popover recipe. For those of you who aren't my sister and have maybe never had a popover, this is what they look like:

Image courtesy of whatscookingamerica.net

They're made using an egg-rich batter, and if you've ever watched popovers (from outside the oven of course, because under no circumstances should you open the oven door one second before they're done) they do much the same thing as these pancakes did. The outside of the popovers rise before the middle does, but because of the shape of the popover pan, the middle eventually rises as well. Well, when using a shallow gratin dish instead, something completely different happens.

But listen to me rattling on about popovers when this post isn't about popovers; it's about pancakes so let's get to it. First, the ingredients:

butter, eggs, milk, flour, vanilla extract, orange zest, salt

In addition to these, there were also a 1/2 pint each of raspberries, blueberries, and sliced strawberries, which I gently combined in a bowl with some sugar:

Surprisingly, even though I made this in the fall, the berries were still pretty good

I set the berries aside to macerate and preheated the oven. Using the same gratin dishes I used for the Bay Scallop Gratins, I divided all four between two sheet pans and placed a teaspoon of butter in each dish.

Using a whisk, I combined the eggs and milk. I slowly added the flour, vanilla, orange zest, melted butter, and salt. I poured the batter, which was pretty thin, into a medium-sized measuring cup to make it easier to pour:


Once the batter was ready, I did the same thing I would have done with a popover pan. I put the gratin dishes in the oven to melt the butter and preheat the dishes:


This took about 3 minutes. Once the butter was hot and bubbly, I took the dishes out. The melted butter needed to cover the bottom of each dish, but it had sort of pooled to one side, so I had to try and swirl each one to coat the bottom. This was easier said than done since the dishes were all 425 degrees and I was trying to work quickly. Once each dish was pretty well coated, I divided the batter equally among the four dishes:


The pancakes baked for about 12 minutes until they were puffed and lightly browned. I was so sure these would fall flat on their face, but lo and behold, they rose beautifully!

ta DAAAA!!

Since the dishes were split between two sheet pans, one of the pans had to be on the bottom rack, so they took a few extra minutes, but they turned out beautifully as well. How beautiful, you ask? Ummm...

Hi.

Hello.

As you can see, once the pancakes were out of the oven, I divided the berries, which were now a little juicy and very sweet thanks to the sugar, evenly among them. This sweetness cut through the egginess of the batter, which was something I was worried about given that I really don't like eggs.

These were so freaking delicious, you would not believe it. I'm getting excited just writing about them.

You all: Ugh Morgan, we're just so impressed that you got up early and made this fancy breakfast. I mean, could you be any more awesome? 

Me: Oh please, it was nothing. A little flour, a little butter. Psh.

Ok, full disclosure: I actually made these for dinner. Anyone who knows me knows I am not a morning person. And although I do love breakfast, especially pancakes, there was no way I was dragging myself out of bed before 10 to get these things in the oven. But I made the full recipe which serves 4 for breakfast, and it turned into an awesome dinner for 2. Just look at how pretty our table looked:

Please note the other 2 pancakes waiting to be devoured in the background.

I added some warm maple syrup to mine which was D-lish, but Dan had his straight up with the berries and their yummy juices. Ideally, I also would have dusted these with some confectioner's sugar to make them even prettier, but we didn't have any.

And I must say, those gratin dishes were well worth it. When I first bought them, I was a little concerned I would use them once and then they would sort of be the odd things that I always wanted to use but could never find a use for. But I will definitely use them over and over again if for nothing else, than just for these delicious creations. 

Make this when: you're making someone breakfast in bed. The batter comes together really quickly so you won't have to wake up super early. And while the pancakes are in the oven you can crisp up some bacon and whip up a mimosa.

Next Course: Tomato and Goat Cheese Tarts

Wednesday, October 21, 2009

Homemade Granola Bars

After the latest salad debacle I felt it was time to cook something I felt more confident about so, I turned on the oven.  Ina has a whole chapter devoted solely to breakfast, which is my favorite meal of the day. People who know me well also know that this is somewhat ironic since I hate eggs. That's right, I don't like 'em scrambled or boiled, poached or in an omelet. And every time I see someone else enjoying a delicious omelet filled with salty, crunchy bacon, creamy cheese, and fresh veggies, I sigh and wish my palate wasn't so damn picky. But alas...

This still leaves me with all the yummy carbo-loaded breakfast foods like pancakes, home fries (not hash browns), croissants, and bagels. Yummm. But, I'm getting myself off track. And hungry.

There are plenty of good options in Ina's breakfast chapter, but, like I said, I was looking for something relatively stress-free, and decided granola bars were the way to go. I bought all the ingredients about a week before baking, since they are all dry and could be kept in the pantry for a while. This felt sort of like a lazy Sunday project, so this past Sunday I went into the kitchen and started baking. I preheated the oven and prepped the baking dish:


Although I was using a disposable tinfoil pan, I still buttered and lined it with parchment paper, as per the instructions, since you can never be too careful. Next, I measured out old-fashioned oatmeal, sliced almonds, and coconut, and placed these on a sheet pan, before tossing them all together:


This went into the oven and almost as soon as the heat hit the coconut, it started to smell great. It baked for about 10 minutes, with breaks every now and then while I stirred it so it could brown evenly. When I wasn't stirring, I measured and chopped the dried fruit:

Dates on the left, Apricots on the right, and cranberries at the bottom

Once the oatmeal mixture was nice and lightly toasted, I took it out of the oven:

Doesn't look like much now, but believe me, it gets better.

I lowered the oven temperature and then carefully transferred this to a large bowl, trying not to let it scatter all over the floor, and added wheat germ:

  I know what you're thinking: Wheat Germ? What could be better than that?!?

Next, I combined butter, honey, brown sugar, vanilla, and salt in a small saucepan on the stove, using up almost my entire stock of honey:

Poor, sad Honey Bear

I put the saucepan over medium heat and waited for the sweet mixture to come to a boil:

Waiting, waiting, waiting

Once it came to a boil, I cooked, stirring for one minute, and then poured it over the toasted oatmeal and wheat germ mixture. I added all the dried fruit and stirred well:

  Mmm, sticky

I poured this mixture into the pan, and spread it out evenly. Ina suggests wetting your fingers and pressing the mixture down into the pan, but I found using the back of a wooden spoon worked just fine. I nonetheless wet my fingers anyway (since Ina said so), but just ended up with wet, sticky fingers. I put the pan in the oven and baked it for about 25 minutes until it was light, golden brown like this:

By now, the house smelled coconutty and delicious, but unfortunately for Dan, these have to rest for 2-3 hours before I could cut them into bars. Ina suggests that these are even better the second day, so I actually waited until the next day to cut them into single servings.

At first I was a bit skeptical. I don't like almonds, or really any nut for that matter, and am not a big fan of oatmeal or dried fruit (although thanks to Dan and his Great Grains, I discovered dates aren't actually that bad). But these granola bars far exceeded my expectations. They're chewy and crunchy and sweet, and way better than your average store-bought variety. Thanks to their numerous ingredients and density, they feel fulfilling and satisfying. The only drawback is that they are a bit crumbly, so they may not be the best choice to eat in the car on the way to work, but they make an excellent afternoon snack. 

Make this when: you want to impress new neighbors with something other than a boring bundt cake. Just make sure they don't have a nut allergy. Talk about a bad first impression. 

Next Course: Homemade Chicken Stock
Related Posts Plugin for WordPress, Blogger...