Monday, May 10, 2010

Coffee and Walnut Fudge

The other day at work, I did something really stupid.

So stupid I considered shutting down my email for the entire rest of the day just so I didn't have to face the inevitable consequences of my actions.

So mortifying that when I told my co-workers about it, their mouths dropped and I could see the relief on their faces that it hadn't happened to them.

And because I know how annoying it is for someone to talk around something without giving you any details, let me give you the cliff's notes: I basically sent an email to someone who never should have seen it. It was from someone I work for (a member of our company) and contained a disparaging remark he had made about the high maintenance of one of our customers.

I sent it to the customer.

And the only reason I learned of this mistake is that the customer replied. To all (i.e. me and the member).

At first, I didn't know what to do. I deleted the email as fast as I could and tried not to throw up. I sat at my desk ignoring the phone ringing, trying to figure out what to do next. Should I apologize and if so, to whom? The customer? Our member?

Should I tell my supervisor? Should I tell my co-workers?

Should I flee the building?

Eventually I got myself together enough to apologize to our member and hope he never ever mentioned it again. But I was still in a complete funk that I had made such a stupid, careless mistake.

And then I got really, really paranoid.

Oh my gosh, the VP's coming over here. He's totaling going to yell at me. Oh no, oh no, oh noooo. Oh my God, I'm getting fired. Am I fired? I am SO TOTALLY fired.

Oh. He just needed the copier.

*Ping* Email received. Oh no, oh no, it's the member who's totally pissed and he's going to ream me out. I can't look, I can't look! I should just close my email for the rest of the day, stop answering the phone, crawl under my desk, and start eating my hair.

Here comes the president of the company. Don't make eye contact. Don't make eye contact! Look busy! Type, type type!!!

I finally calmed down enough to climb down off my cliff of mortification and despair, and once most everyone had gone for the day, I even admitted my faux pas to some of my co-workers so we could laugh about how totally heinous it was. Because with something that bad, there's just nothing you can do about it, but laugh. Or cry. And I DON'T cry at work. I wait until I'm in my car.

The next morning, when I opened my email, I saw the member had replied to my apology. I checked all my other emails first, so that at least I would have gotten through them before the self-loathing set in. Finally, only one remained and I clicked on it with a sense of dread in my gut.

Two words.

"No problem."

I sighed a small sigh of relief and tried to relax.

Until the paranoia returned.

VP looking very serious and telling all of my co-workers: "Guys, we're going to have a quick meeting in the conference room that I need everyone to attend. Yes, right now."

Holy shit. He's going to tell everyone what I did. Did he just give me A Look? He did. He totally did. OMG. He's going to make an example of me and I'm going to be totally humiliated. I may just die of shame. Maybe I should just leave now. Where's the nearest exit?!

Turns out the meeting was about something completely unrelated. Silly me.

So after that stressful experience, I was hankering to make something relatively easy that I could bring with me on my trip to my sister's graduation from law school (yay Alex!!). You can never go wrong with chocolate in my family, and I thought fudge would be something everyone would enjoy. Plus, I think my family's going to kill me if I don't start sending them baked goods in the mail. Must research how to FedEx a whole cheesecake.


Ingredients:

regular sugar (not superfine), corn syrup, heavy cream, milk chocolate, walnuts, butter, coffee extract (which I couldn't find so I used instant coffee)

I started by chopping the nuts, weighing the butter and chocolate, and dissolving the instant coffee so I wouldn't have to multitask while watching my candy thermometer like a hawk.

 I used about a tablespoon of instant coffee and added about 2 1/2 tablespoons of hot water because I wanted a concentrated coffee flavor. Typically, you would add I think 1/4 cup of hot water to that amount of instant coffee.

I put the sugar, cream, and corn syrup into my large pot and stirred to combine. 


I put this over a medium heat and continued to stir until I felt like the sugar had mostly dissolved. It was still a little grainy I think, but had gotten a lot thinner (which was weird since I'm used to mixtures thickening as they cook). This took about 5 minutes. I raised the heat and brought the mixture to a boil, stirring all the while. Once it came to a boil, I put my sugar thermometer* in, lowered the temperature slightly, and stopped stirring. 


*I really like the thermometer I bought, but the only means of clipping it to the side of a pan is at the very top, and I have yet to use a pot tall enough to accommodate it. Instead I have to just balance it in the pot and hope it doesn't fall over, splashing me with searing hot sugar. Why isn't there a clip in the middle somewhere? And who are all these people with their damn tall pots? Like when I have to get even my shirts tailored to fit my 5'2'' frame, I am yet again faced with my shortcomings.


I don't know if you can tell by the pictures, but as the mixture boiled, it got higher and higher in the pot. I knew this would happen which is why I used a large pot, but I was definitely getting a little nervous as it continued to climb. The recipe says to let this boil until it reaches 255 degrees Fahrenheit, but then there is a parenthesis that mentions that it may only be necessary to bring it to 230 degrees in the U.S. since cream here is thicker than in the UK. I crouched by the stove and watched the thermometer like a hawk as the mercury crept up to 230, also looking nervously at the boiling cream creeping dangerously close to boiling over.

As soon as the temperature hit 230, I removed the pot from the stove and added the chocolate, walnuts, butter, and coffee, stirring to combine. (If I had wanted the fudge to be grainy, as some people prefer, I would have stirred the mixture for 2-3 minutes as soon as it came up to temperature and before adding the rest of the ingredients. But I didn't do that. I'm not enough of a fudge connoisseur to know how I like mine.)


I made sure to stir slowly since there's a note in the recipe to be careful as the mixture doesn't look as hot as it is. 

230 degrees? Searing hot boiling cream that just keeps getting bigger and bubblier? Gee, thanks for the warning. If not for the note to keep the spoon away from my face, I may have just slathered it on like a face mask. Mmm, delish. 

Once the chocolate and butter had melted, I poured it into a baking dish I had buttered and lined with parchment paper. There's no specification as to what size baking dish to use (SO HELPFUL), so I guessed and chose a 9 by 9. Thankfully, the mixture juuust fit.


This smelled really yummy and the last thing to do was just to let it sit overnight. Easy!

The next morning as I was packing to leave for my sister's graduation, I surveyed the fudge, getting ready to prepare it for transport. I thought about lifting the whole block out of the pan to cut it, but wasn't sure I could. I started by cutting it into squares in the pan, like you would brownies.

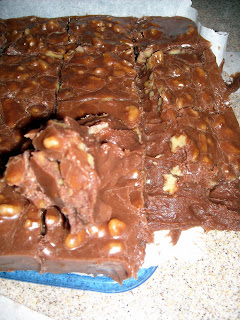
This is where the trouble started. The fudge was still completely soft and not at all set like it should have been. I managed to lift the block out of the pan, just to see if perhaps it was firm enough to separate.

It was not.


This was the very first thing I've made that was truly inedible (although Dan might have proved me wrong if I had given him a chance. He made a small cry when I threw it in the trash. Clearly he's not as devoted as my stepfather who once ate cookies out of the trash that I had burned to prove they weren't ruined. They were, and he was just being nice). Maybe I used the wrong pan so the fudge was too thick to set up correctly. Maybe the sugar wasn't completely dissolved, but I don't think that would have made such a difference. Or maybe I should have let the cream mixture boil to a hotter temperature. While it did reach 230 degrees, it also should have turned light brown when it was truly ready to be removed from the heat, which it didn't. A detail I failed to notice while I was cooking. You'd think an English major would read a little more carefully.

And just because I'm a glutton for punishment, a closeup! Of my failure! To make something so simple, thousands if not millions of people make it every year!


I will not be sharing this with any of my fellow classmates at the FCI. I think they'll make me return my chef's coat. 

So, in summary, things I don't do well: Email. Make fudge.  Shameful.

Next Indulgence: Sachertorte

Tuesday, May 4, 2010

Red Berry Meringue Heart to Share

Since I was on a roll with my pastry bags and piping, and since trying new things went so well, I decided to make a recipe from the chapter on meringues, and this one seemed the simplest. It's meant to be made on Valentine's day (it is a heart after all), but berries are just starting to be in season, and I thought it would be a sweet start to the week (especially after I made Dan take our picture at this pretty park over the weekend, since his arm is so much longer than mine, and then made him do it about 12 more times since I kept deleting every one he took. Hey, it takes a few trys for my amateur camera to capture my true, natural beauty. Also, it took me 3 tries to spell "amateur" correctly. English Major Fail.)

To make the meringue, I only needed 3 ingredients:

 lemon juice, egg whites, and caster sugar

Using the whisk attachment (which I had to search high and low for. AGAIN. What is it with that thing?), I combined the egg whites, a teaspoon of lemon juice, and about a third of the sugar, whisking until it formed firm peaks. This meant the meringue should just hold its shape and stick to the sides of the bowl and whisk. Once I got to that point, I added another third of sugar, and whisked for about 2 minutes. Then, I added the last of the sugar, and whisked just until it was incorporated.


The meringue was shiny, smooth, and soo pretty. Light and fluffy looking, but sort of reminded me of a melted marshmallow in taste and consistency.

Now the hard part: not eating all the meringue before I could get it in the piping bag. Oh, and piping the meringue into a heart shape. I had lightly oiled a sheet pan, and laid down a sheet of parchment paper so it would stick. The idea was to gradually pipe layers of the heart, building it up so as to create a sort of vessel for whipped cream and berries.

Ok, I thought, it's just a heart. I can totally do this. What girl doesn't know how to draw a heart anyway?

Apparently this girl.

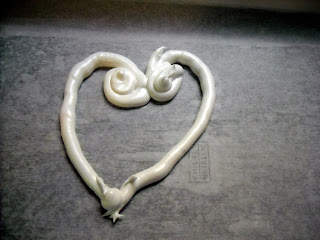
Layer 1: Hmm, not exactly what I was going for, but I'll just do a better job with layer 2. And oh yeah, I'm supposed to taper the end away from the bottom.


Layer 2: Oh Christ. This is not going well. What the hell is that squiggly line on the side? And how did the "taper" get so long?


Layer 3: Why is it all wavy like that? Why isn't it nice and smooth? What's that big hole in the middle. CAN THIS GET ANY WORSE??

Yes. Yes, it can.

Exhibit B: My second attempt. Because the recipe makes way more meringue than you actually need.

At least I remembered that tapered line at the point. Yes, my swirls are different sizes, but Cosmo says that's normal!

What's that condition when half of your face is paralyzed making it all droopy and asymmetrical?

I'll just use this extra meringue to smooth everything out. Ok, now one more layer to smooth all of that out. And anoth...oh crap.

I don't know what possessed me to think I had the kind of artistic talent it takes to make a heart, because let me tell you, that shit is hard. Before I started, I was all, "Oh, it's just a heart. How simple and easy. Piping straight lines last week was a breeze!" Apparently curved lines are a whole other story.

Sadly I had forgotten that I have the hand-eye coordination of a 5-year-old. Seriously, you should see my handwriting; it's like a toddler's. A MALE toddler's.

Let's just do a comparison, shall we?

Hers

 she's prettier, funnier, and perkier than you

Mine

I had to use the extra meringue to make some little puffs to prove I wasn't completely incompetent. Although the first one I did looked like a mangled marshmallow peep.

In hindsight (and I actually thought of this a few days before, but completely forgot it the day I was making this), it would have been a good idea to draw the outline I wanted to use onto the back of the parchment paper, so I could then trace it with the piping bag. See, I am brilliant. Just not when it actually matters.

I put the pan into a low oven, and baked it for 4o minutes. I was constantly opening the oven to check the temperature because my oven likes to get sassy, and thinks it knows what's best. So even though I set it for 225, it decided 250 was really a better temperature. And then 200. No wait, 250. I JUST WANT 225, DAMMIT!

In between running over to check the oven temperature and kicking it repeatedly, I made the filling.

heavy cream, raspberries, and confectioners sugar
I crushed 4 or 5 raspberries using a fork, and put them into my mixing bowl with the cream and sugar.


I whisked this into a flurry until it was nice and firm and a pretty pale pink color.


I put this in the fridge for later. After 40 minutes, I checked the meringue, which still looked shiny, but now a little dry and covered in very tiny little cracks. The recipe cautions not to bake too long or the meringue will be too dry, so I left it for another 6 minutes, and then removed the tray.

 Huh, still looks pretty... "special"

I let the meringue cool on the tray, and then stored it in tupperware until after dinner. It was fragile and a little sticky to the touch.

To assemble, I spooned some of the cream into the center of each heart, and covered it with raspberries and sliced strawberries so no cream was showing. I heated some currant jelly with a little water and used this to brush over the berries as a glaze.

And final product?


See how I used the berries to cover/camouflage the heart? And then decorated/caused a distraction on the plate with more berries and meringue puffs? Just let your eye wander. No, no, don't focus on any one thing for too long. Just skim.

The raspberry cream was delicious. It was sweet, light, and fresh, although the seeds were a little annoying. Paired with the berries, it was really yummy. The meringue was sweet, but it was chewy and very sticky, which made it hard to cut and chew. Dan maaaybe likened it to eating styrofoam. This was actually the perfect description of the texture, so I was impressed enough with his comparative skills not to be offended. Or to realize that I had made my boyfriend something that was supposed to be lovely and romantic, and had ended up feeding him a packing material.

Clearly, I have a lot to learn. Thank goodness I'm going to pastry school.

Before I leave you, I have a confession to make. I know I've mentioned elsewhere that I really enjoy reading other people's blogs, but I wasn't exactly specific about what kind I like to read. *Somehow* ( I could actually explain to you how I got there but it would take way too long and I would lose you halfway through), I have managed to stumble upon and become obsessed with reading blogs written by mothers, or "mommy bloggers" if you can manage to say that without cringing. I prefer to think of them as women bloggers, who, because they mostly fall into the 27-33 age bracket, coincidentally also have small children.

Now, let me assure you, this in no way reflects my current personal wishes. Dear lord, the last thing I would want right now is a BABY. I can barely manage my pharmaceutically altered 13 pound DOG. And I am only admitting this to you because I don't have to see your face when I tell you, because it is a dirty little secret, about which I have only talked to Dan. His concerned response: "Umm, maybe you should try looking for some other kinds of blogs..." as he looked panicked toward the door. And I have. There are two other kinds of blogs I do read faithfully: one is a cooking blog I've linked to over on the right side of this page, and the other is just a funny "day in the life" sort of blog of an author with no children. (If you want the small version of the truth, the latter was my gateway drug blog that led to the discovery of my current favorites even though she is not and has no desire to be a mother herself.)

I've tried searching for new material and have looked through dozens of other cooking blogs, or have searched for blogs written by twenty-somethings, but I've yet to find anything as good as blogs written by mothers about their lives and kids. My major qualification for a good blog is that it's funny. If I'm trying desperately to stifle laughter while I sit at my desk at work, practically suffocating because if I take a breath I'm going to burst into inappropriately loud, uncontrollable laughter, that's the sign of a really good blog.

I think being pregnant or a mother and having small children gives these women something concrete to write about every single day, and the blogs I read are hilarious. Cooking blogs are interesting, but all they make me want to do is bake or eat, both of which I already do enough. I'm more interested in people's day to day lives, and a lot of food bloggers don't really talk about that (hence my attempts to give you funny little snippets of things that happen to me). Blogs written by twenty-five-year-olds just don't have the same kind of focus as blogs written by mothers. I don't really want to hear about your boring day at work or some stupid party you went to where you hung out with a bunch of people I don't know.

I've even gone back into the archives of some of my favorites, to before they had kids, and the posts just aren't as good. I maintain that one of the women I read is actually funnier when she's pregnant. I will say though, that the bloggers I like to read don't just talk about their kids; they also write about their house remodel, in-laws, vacations, etc., and when they do write about their kids or spouses, it's not all rainbows and butterflies. Often they use foul language, call them mean names, complain about their existence, and bitterly wish for different lives, which makes it all the more funny and realistic.

One of the problems I encounter from indulging in this little habit is when I read these blogs at work. I work in a sort of customer service related position, so when all my calls have been made, my inbox is empty, and the phones are quiet, we have a lot of down time, and as I see it, there's no harm in quietly reading on my computer while waiting for the phone to ring.

Now, while I wouldn't exactly want my boss to see me doing this, if my co-worker happens to walk by and see that I'm reading something other than our typical work material, I don't worry about  it. We all do other things while at work on the computer and everyone respects each other's privacy and choices. The problem arises when I'm scrolling through a new blog post that includes pictures of the blogger's young kids (a fairly common occurrence). My biggest fear is that someone will see me looking at them and either think I am some kind of stalker weirdo that lusts after other people's children (Yeah, right. If you know me, you know I am not a huge fan of other people's kids. I was never a babysitter and don't gush over babies. Puppies? Yes. They are furry little nuggets of love. Babies? No. They are bald little bundles of stickiness and drool. And if you have a toddler whose favorite activity is to ask lots of questions or tell me stupid things about which I have to fake enthusiasm, I'm not your girl. My stance is that I'll like my own kids. If they're lucky.) But the other option is that someone (more excited about other people's children) will croon, "Aww, those kids are soo cute! How do you know them!? Are they your cousins?"

Um, define "know."

If by that, you mean know every intimate detail about their gestation, birth, and toddler-hood, but have actually no idea who they really are and have never and will never meet them in person...then yes, I know them and their parents quite well.

So that's my confession. I have become perhaps unhealthily obsessed with the lives of people I do not know, and enjoy reading about them daily. Oh, and I eat peanut butter right out of the jar. I use a spoon! Geez people, RELAX.

Next Indulgence: Coffee and Walnut Fudge

Monday, April 26, 2010

Chocolate Eclairs

Sorry it's been a little while since my last post; I had an Incident a little over a week ago in which a particle of something attacked my eye and managed to scratch my cornea. And yes, it was about as pleasant as it sounds. Did I mention I was halfway through a wedding when this happened? A wedding for one of Dan's friends, so I was meeting lots of people for the first time? Wearing one contact lens? With an angry, red eye that I couldn't really open fully?

As you can imagine, my beauty was outdone only by the bride.

But I'm all better now so it's time for my first foray into pastry (for this cookbook anyway), Chocolate Eclairs!

There were really three elements that went into making these eclairs: the fondant icing, the choux pastry, and the chocolate pastry cream. My plan was to make the icing and pastry cream one day, and make the pastry and finish the eclairs the next. 

The first thing I made was the icing:

confectioners sugar, water, corn syrup, dark chocolate

I put the sugar, water, and corn syrup in a small saucepan, stirred to combine, and then put it over a medium heat. 


Stirring constantly, I heated the mixture to about 92 degrees (or as best I could estimate since the lowest temperature on my thermometer is 100).


This only took a couple of minutes and the mixture thickened quickly. 


I poured this into a bowl, covered the surface with plastic wrap, and left it to cool to room temperature.


I was all set to start on the pastry cream, until I realized that what I thought was corn starch was actually baking soda, and sadly none of our little neighborhood markets carried it.  Masa, yes. But corn starch, no; too foreign.

The next day, after I had procured the corn starch from the regular grocery store, I made the chocolate pastry cream. It's possible to substitute this pastry cream with simple whipped cream, but as a chocolate lover, I was pretty excited about making it. Plus, I don't really think homemade whipped cream has much flavor, at least not when I make it. It's not sweet or flavorful enough for me, but maybe I'm not using enough sugar or vanilla. I actually think adding some vanilla bean to whipped cream would be delicious...but I digress. 

Ingredients for the chocolate pastry cream:

flour, corn starch, egg yolks, caster sugar, whole milk, dark chocolate

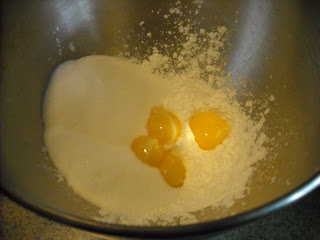
Into a bowl, I sifted the flour, and then added the corn starch, sugar, and egg yolks. 


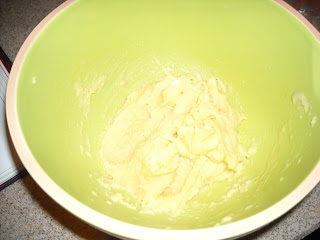
I started to mix this by hand, but it wasn't forming the paste I needed it to, so I switched to my stand mixer, hoping that would move things along more quickly. At first, the mixture was still grainy and I worried it would never smooth out, but I managed to be patient, and finally it formed a nice, smooth paste.


While this was mixing, I put the milk in a small saucepan and brought it to a boil. I added the hot milk slowly to the paste with the mixer on low and then poured the whole thing into a clean pan.


This pan went over a medium heat and I whisked constantly until it thickened and came back to a boil, which didn't take long. I lowered the heat and it "simmered" for another minute or two. I say "simmered" because with such a thick mixture, I only got a few big bubbles at a time, but I didn't want to make the mistake of cooking it for too long.


I removed the pan from the heat and added the dark chocolate, which I had broken into small pieces. I stirred this to incorporate the chocolate as it melted, and then poured the mixture into a bowl to cool to room temperature. By this point, the pastry cream had the consistency of a very thick chocolate pudding.

I also made sure the surface of this was covered in plastic wrap so it didn't form a skin. Appetizing, right?

While the pastry cream was cooling, I started on the choux pastry for the actual eclairs. This is the same kind of dough used to make creme puffs or profiteroles, as it puffs while it cooks, forming a hollow structure perfect for filling (theoretically).

flour, sugar, water, butter, salt, eggs

I combined the flour and sugar in a small bowl and put it aside. In a separate bowl, I beat two eggs together lightly. I put the water, butter, and salt in a small pan and brought it to a boil over high heat. 


As soon as it boiled, I added the flour and sugar all at once and stirred constantly until it formed a ball in the center of the pan. Once I got to this stage, I lowered the heat to medium and stirred for another minute to dry out the dough slightly. I'm sorry I don't have more photos of these steps, but everything had to be done pretty quickly, and I only have two hands.

I transferred the dough to a bowl and stirred it just slightly to let some of the heat escape. I started adding the beaten eggs a little at a time, mixing well with a wooden spoon after each addition. I mixed until the dough became a smooth, thick paste.

right out of the pan

After adding all the egg

I transferred the finished dough to a pastry bag fitted with a 1/2 inch plain tip and piped it onto prepared baking sheets (I brushed the baking sheets with melted butter before starting and chilled them in the fridge to harden). I piped the dough into lines 5 inches long and about 1 1/2 inches apart.


I planned to pipe 12 on each onto two baking sheets since the recipe made 24, but only had enough dough for 17. I worried I had made them too big, but I had measured the pastry tip when I bought it, and used a tape measure to be sure I made each eclair the right length. (Sidenote: I don't have much experience using piping bags, but I really enjoyed doing this. Using such a large, plain tip made the process nice and simple, and the dough was very easy to work with.) I considered making more dough since I still had all the ingredients, but then thought that if I had made them too large, and then made more, I might not have enough pastry cream for all of them. Oh, how wrong I was.

I put the pans at the top of a preheated oven. They baked at a high temperature for about 23 minutes, and then at a lowered temperature for another 5. The recipe only gives the baking time for the higher temperature, and then after instructing you to lower the oven, just says to bake them until firm and dry on the inside. The only way to check this was to break one open, which I was sort of sad about since I only had 17 to begin with. This would prove to be not such a big deal in the end though, especially since breaking one open also let me see that the eclairs were not quite as hollow as I wanted them to be.

I took the baked eclairs out of the oven and let them cool on a wire rack.


I was pretty wary when I saw how thin the baked pastries were, but still hoped they had been successful and were hollow inside (a rare and misguided moment of optimism). Once they were completely cool, I needed to make two holes at either end of the base of each one. I hoped I would be able to do this with the tip of a 1/4 inch plain piping nozzle, but when I tried, the tip seemed too big and the eclairs were too fragile. Things were not looking up.

Using the sharp point of a (clean) meat thermometer, I started by poking small holes in the bottom of each eclair, widening them slowly and carefully, so as not to break the ends. I used the pastry tip as a guide so I would know how big to make each hole. This actually seemed to work pretty well.
Not a great picture, but you can sort of see the holes at either end, that is, if my freakishly pale hand hasn't blinded you

Once all the pastries had holes at either end, I reached for the pastry cream, but it was still a little too warm. I put it in the fridge for about 3o minutes, until it was closer to room temperature. I stirred it some to smooth it out and then filled a piping bag, fitted with a 1/4 inch plain tip. I started to pipe the cream into the holes I had made, but quickly realized there was just no way it was going to work. I followed the directions and started piping the cream in one hole, hoping to see it come out the second, meaning the eclair was full. Instead, cream had no where to go and just backed out of the hole onto my hand. I tried to use the meat thermometer and work it gently into each hole and down into the pastry to hollow it out slightly, while trying not to break the pastries. This sort of worked, but really didn't solve the problem. I attempted more piping and got 9 or 10 filled most of the way.

They may look filled, but really I just piped some cream in each hole

See? Empty.

At this point, I really felt like giving up and chocking this up to my first failure, which was particularly disheartening since this was my first attempt at one of the pastry recipes, and I had really been looking forward to bragging at work that yes, I made every part of these from scratch. Perhaps my hubris was my downfall. 

Once I accepted that these just weren't going to be successful enough to give to other people, I decided to work with what I had. After all, more for me! Nothing dulls the sting of failure quite like chocolate-filled, chocolate-dipped pastry. Really, you should try it some time.

I checked each one and those that hadn't been filled completely, I broke in half, filling each half with the pastry cream.

 
I had a ton of pastry cream left over, at least half, maybe more. Clearly, I should have had more eclairs to fill or the eclairs should have been bigger to accommodate more cream (A LOT bigger. There was so much pastry cream left over, I saved it so Dan could eat it as pudding)

One of the reasons I wanted to find some way to finish the eclairs was because I really wanted to finish the fondant icing I had started the day before. To do that, I poured what I had into a small pot and warmed it slightly, to about 90 degrees. Once warm, I added chopped dark chocolate a little at a time until I had the right consistency and flavor I wanted.


I dipped the top of each filled eclair into the icing, and then tipped it downward so the excess could drip off. There's a note in the recipe that if the icing is too much work, you can dip the eclairs into melted chocolate and then let them harden in the fridge, but the icing was one of the easiest parts of this dish. Everything went in one pan, it only heated a little, and only used a few ingredients. I also thought it was very successful in both flavor and texture. I put the finished eclairs onto a piece of waxed paper so the icing could harden.

Look! They look like real eclairs! Except small and...broken. And yes, they are on wax paper, not just the counter.

I tasted each element as I went along, and each was good on its own, but when I tasted them all together at the end, they were sinfully good. Sweet, crunchy, creamy, and chocolaty. Even though they weren't the right size, they really tasted just like an eclair should. I really wish the dough had been more successful because these tasted so so good and I would have loved to show them off at work. Oh well, guess I'll just have to make cookies instead.

[Edited to Add: I brought one of these to work to eat after lunch, and of course after writing about them and publishing this, I really wanted it. And it was SO FREAKING GOOD. SO GOOD. I'm sort of happy now that they didn't turn out perfectly because MORE FOR ME. Family: now would be the time to start talking to an Interventionist.]

Next Indulgence: Red Berry Meringue Heart to Share
Related Posts Plugin for WordPress, Blogger...